The camera lens blur effect is one of the most useful and powerful effects in After Effects for adding lens blurs and simulating realistic looking depth of field in your compositions and footage.
In this ultimate guide we’ll run through all aspects of the camera lens blur effect in After Effects. Alternatively, check out our Focal Script if you’re looking for the quickest way to set up a camera lens blur in After Effects.
Use the links below to jump to a relevant section:
- How to apply the camera lens blur effect
- What the camera lens blur settings mean
- How to create a simple blur map for the camera lens blur effect
- Create a tilt-shift camera lens blur effect
- How to use a 3D depth pass with the camera lens blur effect
How to apply the camera lens blur effect
Step 1. Create an Adjustment Layer
To create an adjustment layer go to: Layer > New > Adjustment Layer.
In the majority of cases the camera lens blur effect should be applied to an adjustment layer in After Effects. When applied to an adjustment layer the camera lens blur will affect all the layers underneath it. If you don’t want a layer to be blurred, simply drag it above the adjustment layer.
Step 2. Apply the camera lens blur effect
With your adjustment layer selected, search for “Camera Lens Blur” in the effects and preset panel and double click the effect. Alternatively, go to Effect > Blur & Sharpen > Camera Lens Blur
The camera lens blur settings:
Blur Radius - This is effectively the amount of blur being applied. Increase this number to increase the blurriness.
Iris Properties - In real world camera the blur / depth of field is controlled by the iris of the camera itself. These properties are used to mimic the real life camera iris properties.
Shape - The iris shape determines the general shape of the blur or “bokeh”. The example image below shows what happens when the iris shape is set to triangle… you can see the rough outline of a triangular shape as the image is blurred.

Roundness - This applies a roundness to the iris shape. Set it to 100% and whatever shape you select in the iris shape will become a circle.
Aspect Ratio - By default the aspect ratio is set to 1, increasing this will produce a wider bokeh blur style, decreasing it will produce a more narrow look.
Rotation - The rotation value will rotate the bokeh to your given value.
Diffraction Fringe - This value adds more opacity to the centre of the bokeh, if you want an outer ring style bokeh then set this to 500 and make sure the roundness value is set to 100%.
Blur Map - The blur map is where you specify which parts of your footage are going to be blurred. Traditionally, blur maps will be a greyscale image, the whiter parts of the map will have more blur applied to them, and the darker parts of the map will be less blurred.
Layer - This is where you can specify a layer to act as your blur map. If you are using a gradient ramp or effect on a layer to produce a blur map you will either need to precompose your layer or make sure the second drop-down list is set to Effects & Masks.
Channel - Usually this will only need to be set to Luminance because most blur maps act are black and white. If your blur map uses a different colour mode, set this to the relevant one here.
Placement - This determines how your blur map will be positioned/handled. If your blur map is the same size as your composition then keep this set to Center Map, if your blur map is a different size, you may need to select Stretch Map to Fit
Blur Map Focal Distance - This setting is mostly used to adjust the blur distance. For example, take a look at the blur map below:
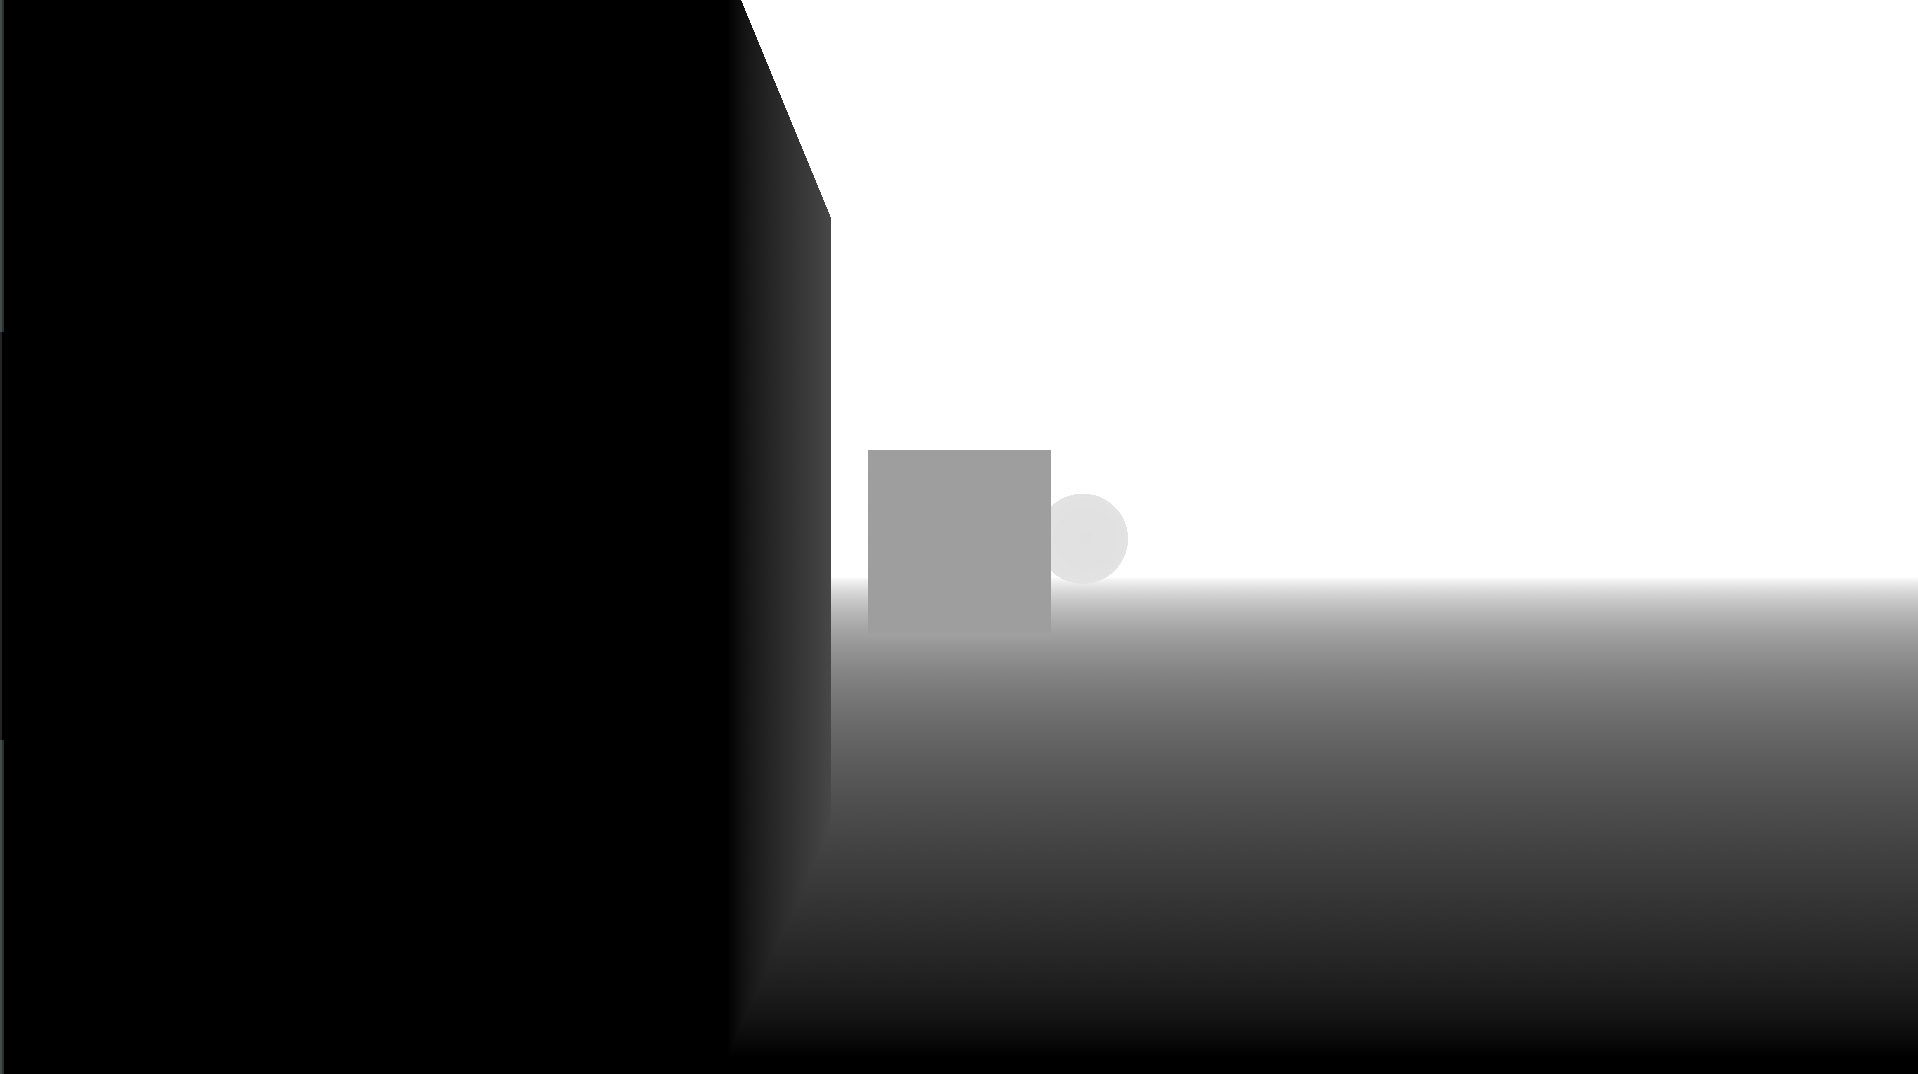
With the focal distance set to 0 you can see that the foreground object is clear, and the two background objects in the distance are blurred out:
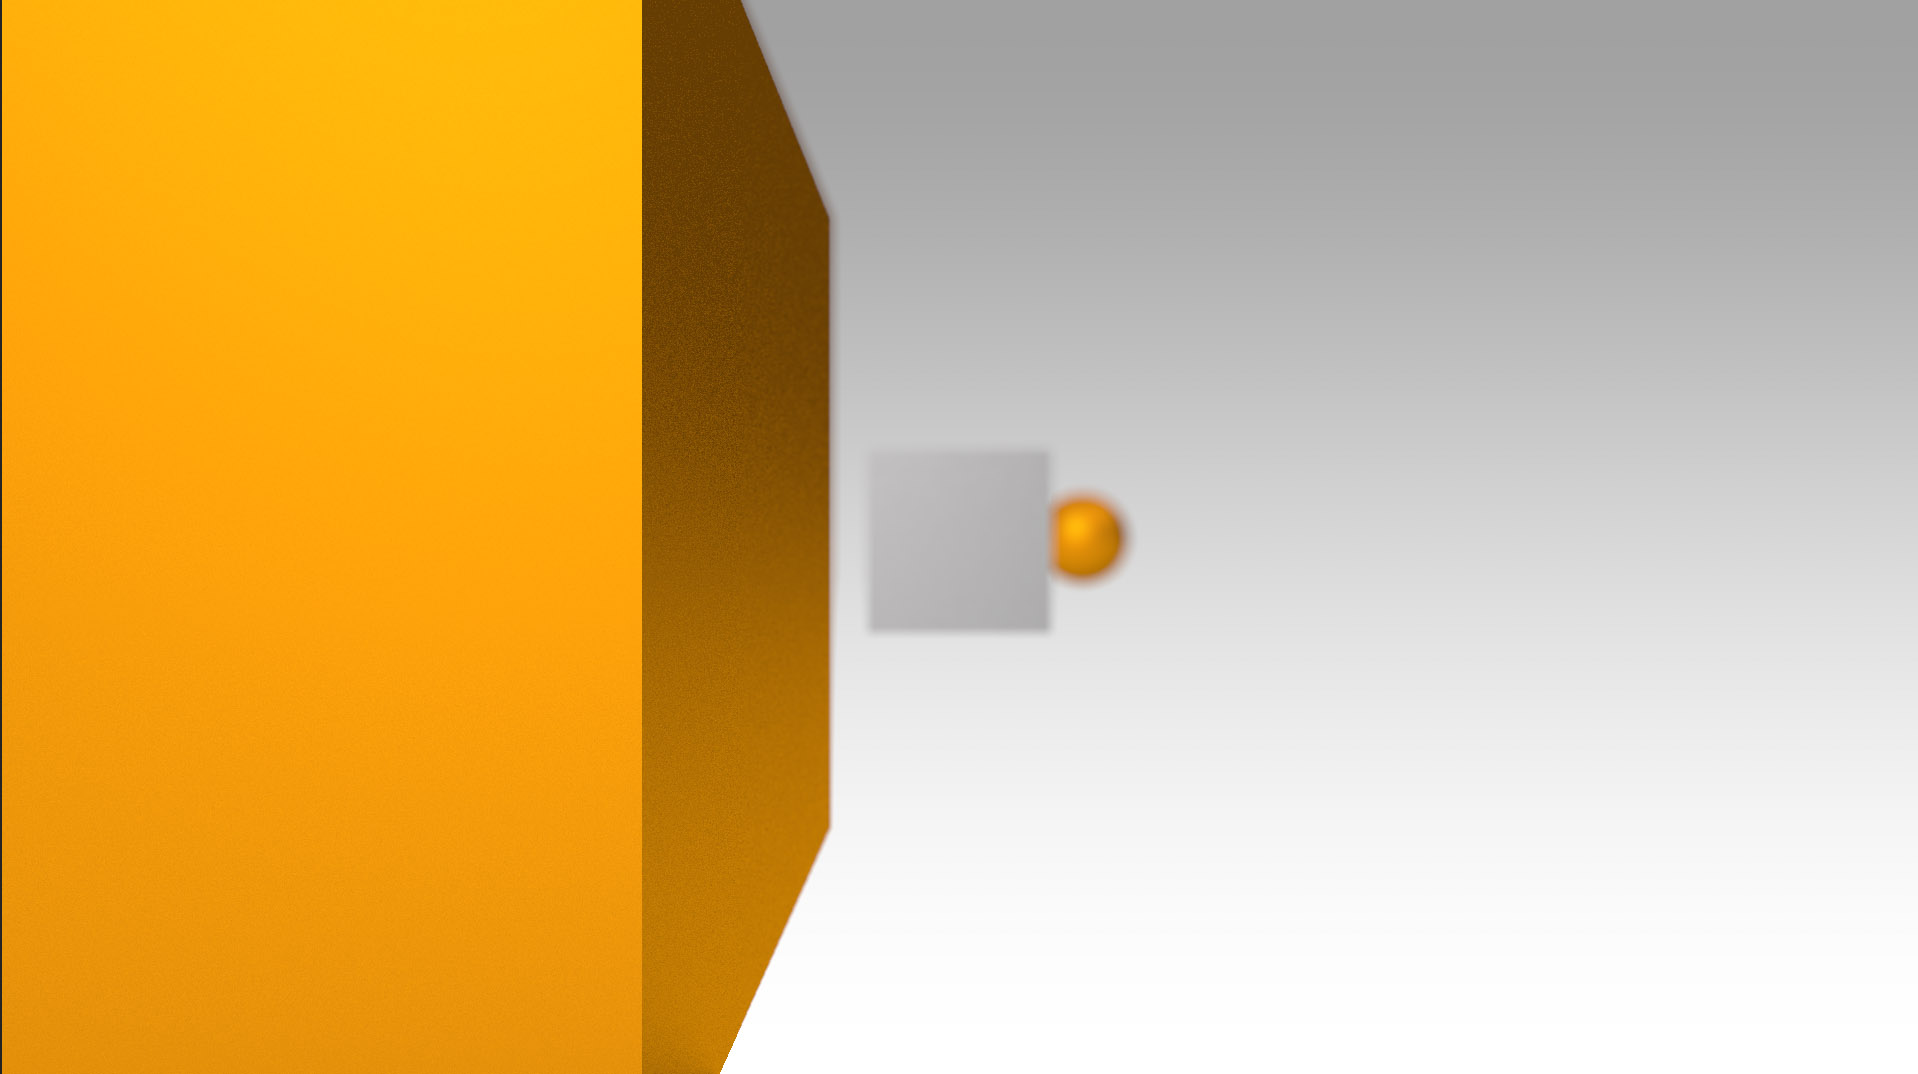
With the focal distance set to 154, you can now see that the middle object is now in focus:

With the focal distance set to 255, you can now see that the farthest object is now in focus:

Invert Blur Map - Does exactly what it says on the tin, this would effectively turn all the black areas to white and all the white areas to black within your blur map.
Highlight - The highlight values are kind of like colour correction values for the blurred image.
Gain - This option boosts certain pixel’s brightness within the frame.
Threshold - This setting affects the luminosity of different pixels. Setting this to 0 boosts any pixel with a brightness value greater than 0. Setting it to 1 effectively eliminates any highlights whatsoever.
Saturation - The amount of color retained in the boosted pixel. Setting this to 0 will create a more washed out look. Setting this value to 100 and your image will likely become over-saturated.
Edge Behaviour / Repeat Edge Pixels - When this option is unchecked you’ll quite often get an unwanted blurring effect around the edge of your frame. Checking this option repeats the edge pixels so the edge blur isn’t seen.
How to create a simple blur map for the camera lens blur effect:
Want to save time? The Focal Script will create blur maps and configure the camera lens blur effect for you at the touch of a button.
Make sure you already have an adjustment layer added to your comp and the camera lens blur effect applied to it.
Step 1. Create a new solid layer
To create a basic blur map for the camera lens blur effect, the first thing you need to do is create a new solid layer by going to: Layer > New > Solid
Make sure the size matches your comp size and hit OK.
Step 2. Apply a gradient ramp effect
In the Effects & Preset panel, search for the effect: Gradient Ramp and apply it to your new solid layer.
Step 3. Set the Blur Map of the Camera Lens Blur effect
In the Layer drop down list under the Blur Map settings, choose the new solid layer you’ve just created.
Make sure you change the second drop down list to Effects & Masks
Step 4. Turn the Blur Map layer visibility off
In the timeline, click the little eye icon of your new solid layer to hide it from view.
You now have a blur map!
You should now have a blur map that’s being used by the camera lens blur effect. Remember: the lighter the values of your gradient, the more blur will be applied to them.
TIP: Try changing the Start of Ramp and End of Ramp positions to customise the look and feel of the blur. You can also edit the Blur Focal Distance as well.
Create a tilt-shift camera lens blur effect:
The Focal script not only streamlines the camera lens blur setup, it also gives you the power to create tilt-shift camera lens blur effects at the touch of a button in After Effects.
Take a look at the run through of Focal:
How to use a depth pass from 3D software with the camera lens blur effect:
Make sure you already have an adjustment layer added to your comp and the camera lens blur effect applied to it.
Step 1. Render out a depth pass
Pretty much every 3D program out there will allow you to export a depth pass for your 3D compositions. In Blender for example, you can export a mist pass which will give you the depth information.
In Cinema 4D, you can choose to render out a depth pass in the Multi-Pass section of the Render Settings or you can use Cineware to automatically import your depth pass (see below).
A depth pass will typically look something like this:
Step 2. Import your depth map pass into After Effects
Your depth pass will usually take the form of an image or image sequence for videos. Once you’ve rendered your depth pass, import it into After Effects.
Important: When you import your depth map, it may have transparency included within it which needs to be turned off. To do this, right click your layer in the project panel and choose Interpret Footage > Main. Then under the Alpha section choose the **ignore** radio button and click OK.
Note: If you’re using Cineware for After Effects it’s even easier to import your depth map. Just duplicate your Cinema 4D layer in your timeline, then enable the Cinema 4D Multi-Pass checkbox at the bottom of the cineware effect. Then click the Set Multi-Pass button and choose Depth from the dropdown. (If depth isn’t listed, double check it’s enabled in the Multi-Pass Render Settings within Cinema 4D).
Step 3. Set the Camera Lens Blur map
In the camera lens blur settings, select your blur map layer in the Layer drop down list.
Step 4. Hide your depth map layer
In the timeline, click the little eye icon next to your blur map layer to hide it from view.
Step 5. Customise the blur level
With the blur map now applied, try increasing the blur radius or adjusting the blur focal distance.