It’s almost a right of passage for a motion designer to have a go at creating a glitch effect in After Effects at some point in their career.
Glitches, and digital distortion are a staple of sci-fi compositions and any sort of futuristic scenery, funny how in the future we still haven’t managed to create a perfect signal… but that’s for another blog post.
In this post, we’re going to look at how to create a glitch effect right within After Effects using no external plugins.
Alternatively, if you're in a rush, our Fragment glitch effect After Effects script does all the hard work for you at the touch of a button.
When it comes to creating a glitch effect, After Effects actually has a number of different tools which can help, here’s one way of creating a glitch:
Preparing the layers you want to glitch
The first step is to select all the layers you’d like to apply the glitch to, and precompose them. To do this, select the layers and choose Layer > Precompose.
Make sure the Move all attributes option is selected and choose a suitable title for your layers, for this example we’ll use: Layers to glitch.
Creating the glitch
Step One: Create Some Noise
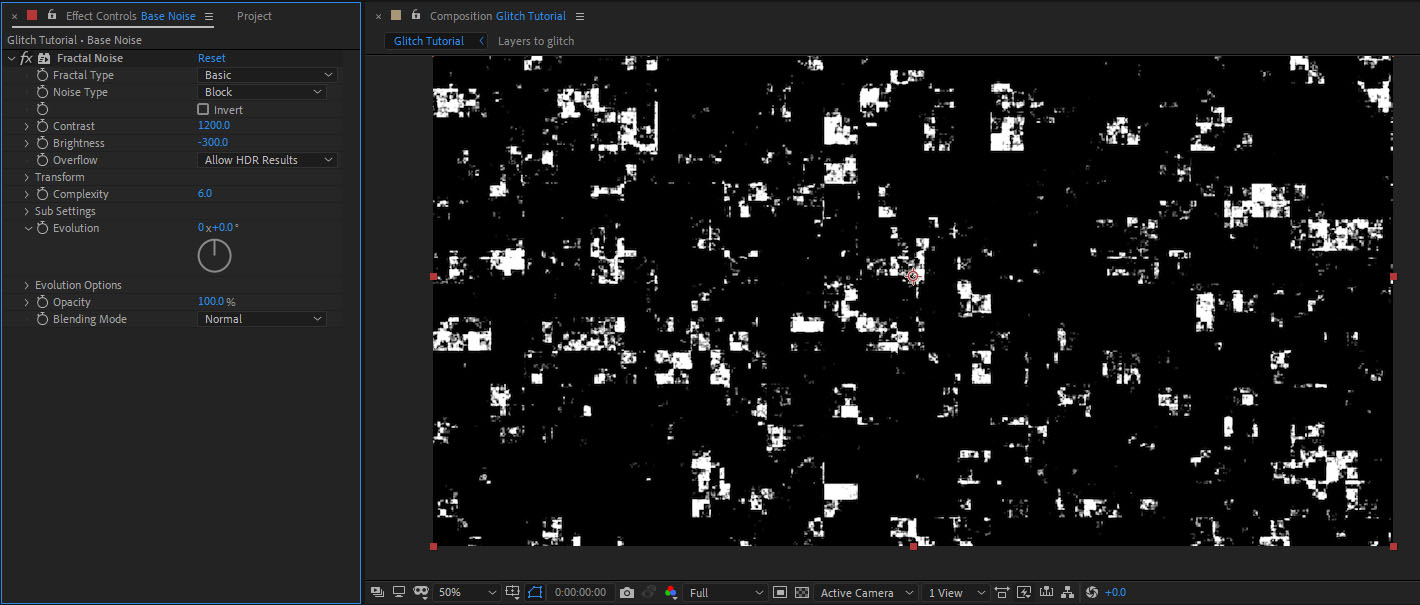
At the very heart of a glitch effect is exactly what a real glitch is made of: noise. In this case, we’re going to use Fractal noise.
Create a new solid the same size as your composition and name it Base Noise - then apply the fractal noise effect from the Effects & Presets panel or choose Effect > Noise & Grain > Fractal Noise.
In the effect settings for the fractal noise, choose the following settings:
- Fractal Type: Basic
- Noise Type: Block
- Contrast: 1200
- Brightness: -300
Next, alt-click the little stopwatch on the evolution parameter to bring up the expression controls. Replace the current expression with:
time*500
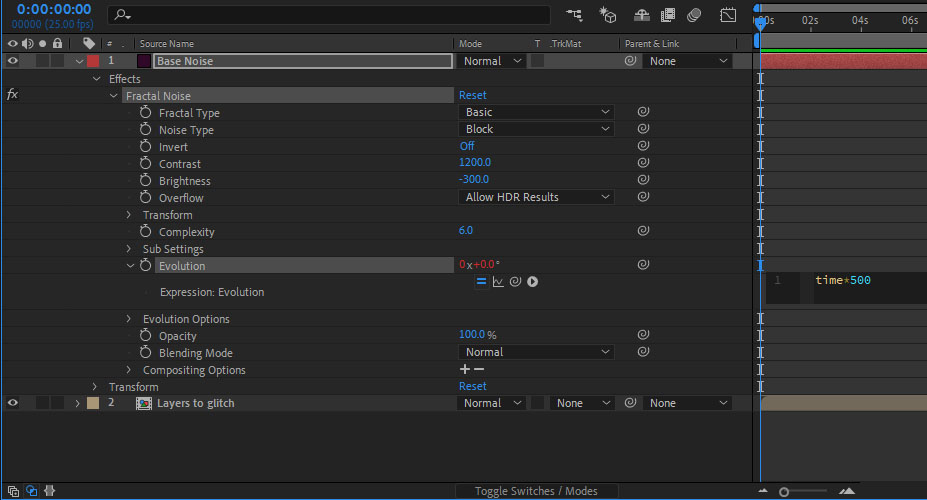
Now if you scrub through the timeline, you should see the fractal noise randomly change.
The next thing we need to do is precompose this base noise layer, by choosing Layer > Precompose.
Make sure move all attributes is checked and name the precomp something like: Core Glitch Effect.
Step Two: Create a red version of the noise
Select the Core Glitch Effect composition and duplicate it by choosing: Edit > Duplicate, or pressing Ctrl+D on your keyboard (cmd+D if you’re on a mac).
Select the newly created Core Glitch Effect 2 layer and rename it: Core Glitch Red - with the layer still selected choose Effect > Color Correction > Tint.
In the effect controls, press the white square next to Map White To option and choose a shade of red (ideally: #FF0000).
The fractal noise effect should now be black and red on your screen.
The next step is to shift this layer’s position over to the left, you can do this by selecting the layer and hitting the P key, click the first blue number and change it to be around 20 pixels less than the current value.

Alternatively, click and drag the layer over to the left slightly in the composition window.
Next, we need to change the layer’s transfer mode. In the left hand side of the timeline window you should see a drop down box with the word Normal in it, if you don’t you may need to click the button at the bottom of the screen that says Toggle Switches / Modes
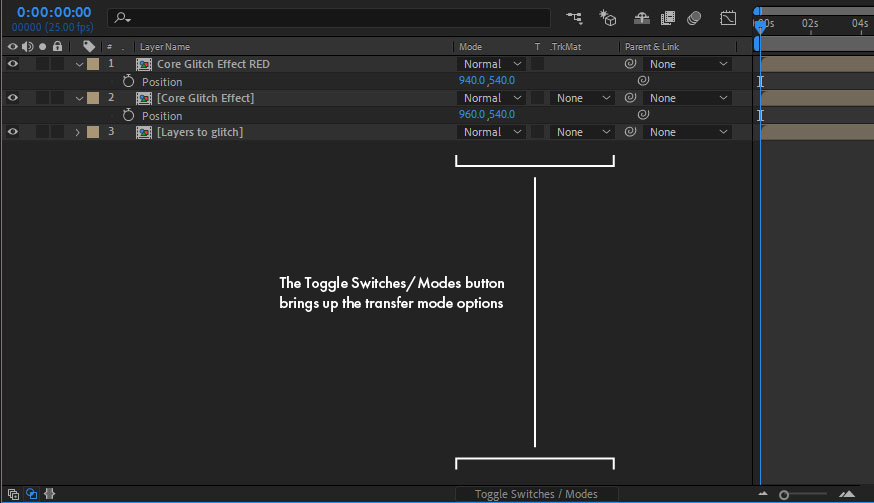
Click on the drop down list and choose Add.
Step Three: Create a blue version of the noise
Next, duplicate the Core Glitch Red layer, rename it to Core Glitch Blue and in the Tint effect controls change it from red to blue (#0000FF).
Finally, we need to shift the Core Glitch Blue layer 40 pixels to the right, it’s the same process as shifting the red layer, only this time we want to shift it right, along the X axis.
Step Four: Precompose the noise layers
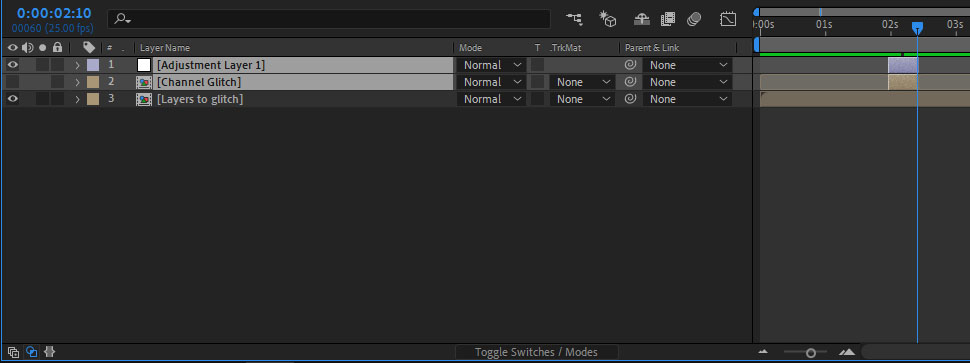
Select the three Core Glitch layers (red, white, and blue) and precompose them by choosing Layer > Precompose, and call the new composition something like Channel Glitch.
Now turn the Channel Glitch layer off - to do this press the little eyeball next to the layer in the timeline window.
Step Five: Create a displacement map
The next stage is to add an adjustment layer, by choosing Layer > New > Adjustment layer and then we’ll apply the Displacement Map effect by clicking Effect > Distort > Displacement Map.
In the displacement map effect settings, click the first dropdown list for the Displacement Map Layer setting and choose the Channel Glitch composition layer we’ve just created.
You should be able to see a slight glitch effect happening on the layers below your adjustment layer now.
To amplify the glitch displacement we need to change the following values:
- Max Horizontal Displacement: -25
- Use for Vertical Displacement: Blue
- Max Vertical Displacement: 10
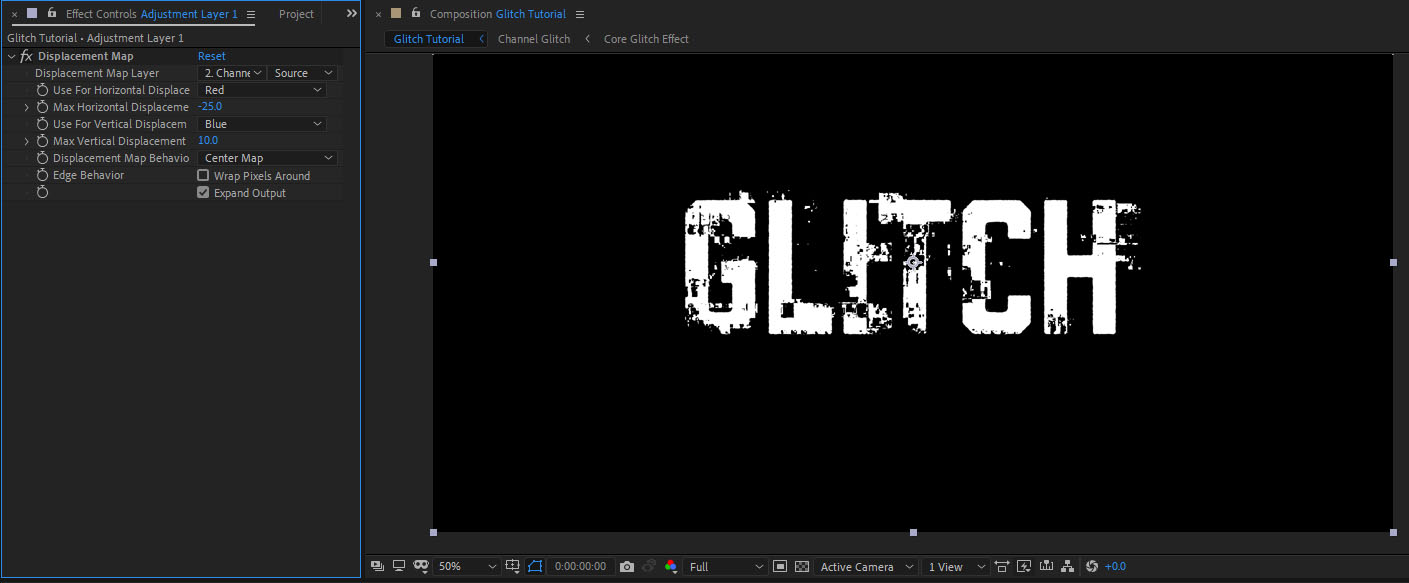
You can experiment with the numbers above to suit the glitch you’d like to create, if you’d like to shift your layers more then choose a larger number, only want a subtle glitch? Choose lower numbers.
Next, we’re going to add an extra flourish to the glitch.
Step Six: Add the Wave Warp Effect
In the effect panel, drag and drop the Wave Warp effect onto the adjustment layer below the displacement map effect. Alternatively, with the adjustment layer selected choose Effect > Distort > Wave Warp.
Then change the following settings:
- Wave type: Noise
- Direction: 0
This will give your layers quite a fuzzy look, so we need to change the wave height and wave width settings - you should really experiment with different values for these as they can provide a whole range of styles that suit different glitch types.
For this example, we’re going to create quite a noisy glitch so we’ll use the following values:
- Wave height: 12
- Wave width: 500

Step Seven: Trim the glitch layers
So now we have our glitch effect, and at the moment it’s being applied wherever our adjustment layer is, but in a lot of cases you’ll only want to apply it for a couple of frames or so.
Move the current time indicator to where you’d like the glitch to start, select the adjustment layer and press Alt+[ (or OPTION+[ on a mac) on the keyboard to change the in-point of your adjustment layer to this point in time.
Next, move the current time indicator to where you’d like the glitch to end and with the adjustment layer still selected, press Alt+] (or OPTION+] on a mac) on the keyboard to change the out-point of the adjustment layer.
If you scrub along the timeline, you should now see that the glitch only happens when the adjustment layer is above your layers. If you want more glitches, simply duplicate the adjustment layer and move it along the timeline.
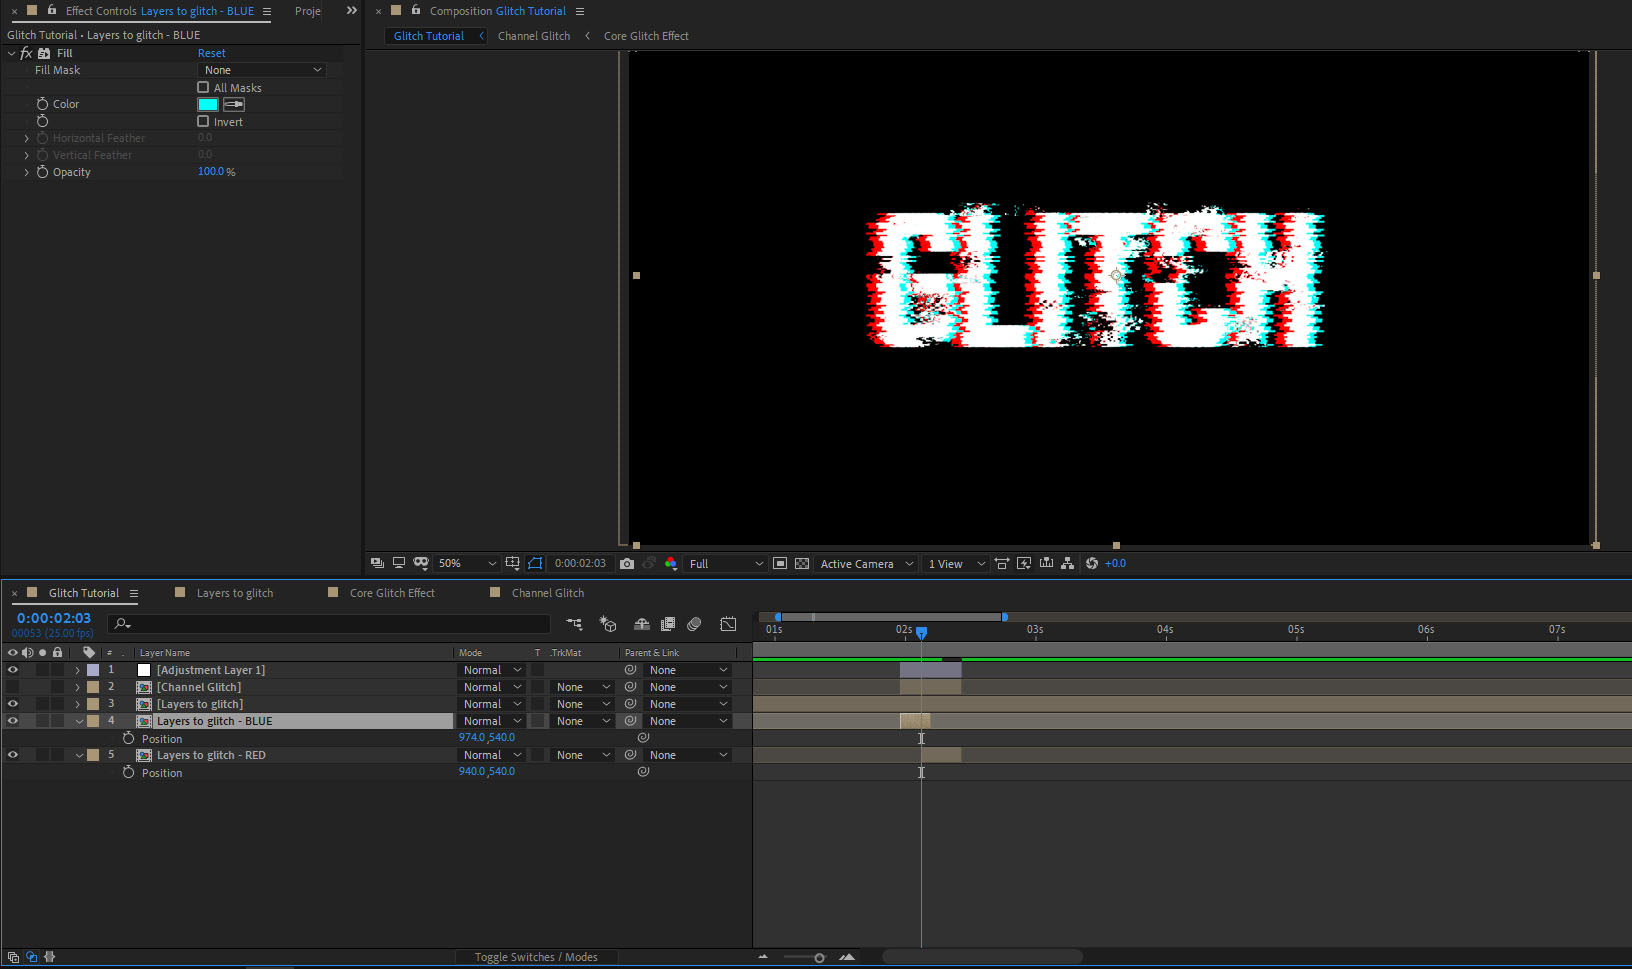
Step Eight: Add the red glitch colour
Now that we have our glitch effect, we can also introduce a split colour effect when the glitch happens. To do this select your Layers to glitch composition and duplicate it by choosing Edit > Duplicate.
Rename the duplicated layer Layers to glitch - RED and move it below your Layers to glitch layer.
In the effects panel search for the Fill effect and apply it to the Layers to glitch - RED layer.
Change the Fill colour option to a colour you’d like for your glitch - in this example we’re going to keep things as red.
With our layer now filled red, we want to move it left along the x axis by about 20 pixels or so, much like we did earlier. Again you can do this by selecting the layer and pressing P on the keyboard, then subtract 20 from the first blue number. Alternatively, click and drag the red layer left in the composition window (hold shift to keep things level)
Step Nine: Add the blue glitch colour
Next, with the Layers to glitch - RED layer still selected, we can duplicate it again only this time we’ll rename it: Layers to glitch - BLUE.
With the new Blue layer selected, change the fill effect colour to Blue (or any other colour you’d like to use) - for this example we’ll choose a classic glitch blue colour (#00FFF6)
As we shifted the red layer over to the left, we’ll want to shift this Blue layer over to the right by about 20 pixels or so in much the same way.
Step Ten: Trim the glitch colours
Finally, we only want these blue and red layers to appear when our glitch is happening. To do this, move the current time indicator to the start of the glitch adjustment layer and with both the red and blue layers selected trim the in-point by pressing alt+[ (option+[ on a mac) on the keyboard.
Move the time indicator over to the end of the adjustment layer and with both the red and layers still selected press Alt+] (or OPTION+] on a mac) on the keyboard.
Whenever you duplicate the adjustment layer, you’ll also need to duplicate the red and blue layers and change the in-point/out-point for each when you do.
You could try duplicating the Layers to glitch composition a couple more times and add even more colour if you wanted. Best thing here is to experiment to see which colours and positions work for your project.
And that’s it! Here we’ve created an awesome glitch effect for your futuristic compositions in After Effects.
As mentioned before, we've put this whole process into our handy Fragment script so you can create a glitch in after effects at the touch of a button! As well as a static glitch like we've just created, the script also has options to create glitch transitions that will bring your elements on or off the screen for you.